 Torch-TensorRT is a PyTorch integration for TensorRT inference optimizations on NVIDIA GPUs. With just one line of code, it speeds up performance up to 6x on NVIDIA GPUs.
I’m excited about Torch-TensorRT, the new integration of PyTorch with NVIDIA TensorRT, which accelerates the inference with one line of code. PyTorch is a leading deep learning framework today, with millions of users worldwide. TensorRT is an SDK for high-performance, deep learning inference across GPU-accelerated platforms running in data center, embedded, and automotive devices. This integration enables PyTorch users with extremely high inference performance through a simplified workflow when using TensorRT.
What is Torch-TensorRT
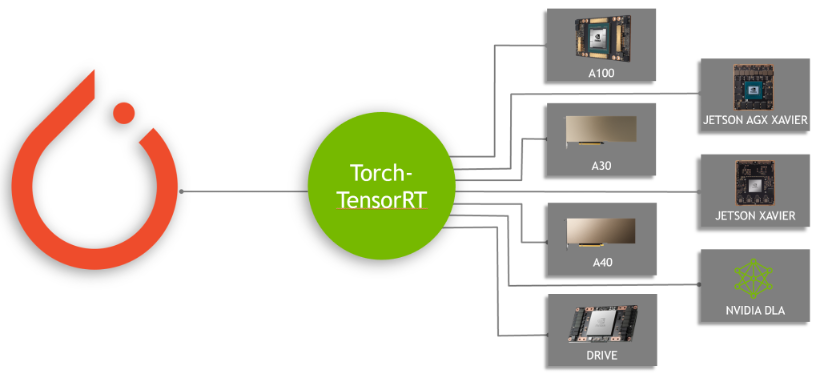
Torch-TensorRT is an integration for PyTorch that leverages inference optimizations of TensorRT on NVIDIA GPUs. With just one line of code, it provides a simple API that gives up to 6x performance speedup on NVIDIA GPUs.
This integration takes advantage of TensorRT optimizations, such as FP16 and INT8 reduced precision, while offering a fallback to native PyTorch when TensorRT does not support the model subgraphs.
How Torch-TensorRT works
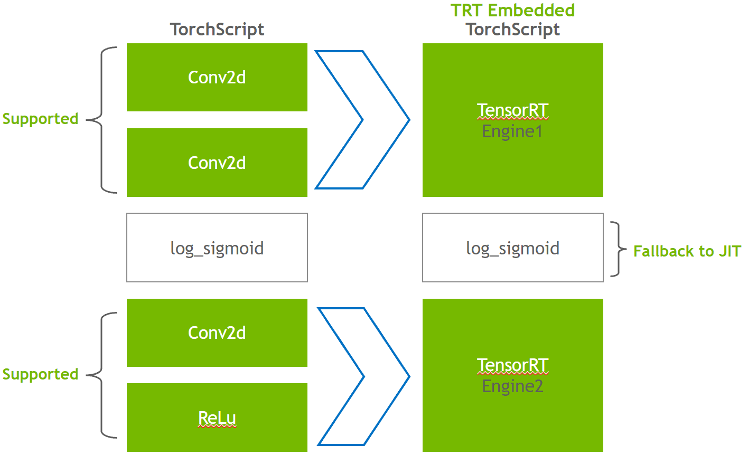
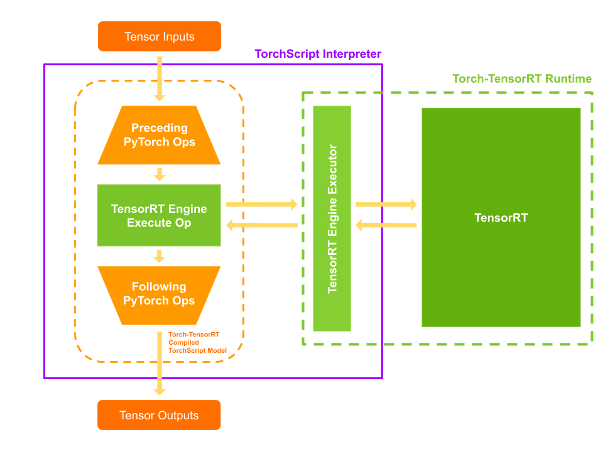
Torch-TensorRT acts as an extension to TorchScript. It optimizes and executes compatible subgraphs, letting PyTorch execute the remaining graph. PyTorch’s comprehensive and flexible feature sets are used with Torch-TensorRT that parse the model and applies optimizations to the TensorRT-compatible portions of the graph.
After compilation, using the optimized graph is like running a TorchScript module and the user gets the better performance of TensorRT. The Torch-TensorRT compiler’s architecture consists of three phases for compatible subgraphs:
- Lowering the TorchScript module
- Conversion
- Execution
Lowering the TorchScript module
In the first phase, Torch-TensorRT lowers the TorchScript module, simplifying implementations of common operations to representations that map more directly to TensorRT. It is important to note that this lowering pass does not affect the functionality of the graph itself.
Conversion
In the conversion phase, Torch-TensorRT automatically identifies TensorRT-compatible subgraphs and translates them to TensorRT operations:
- Nodes with static values are evaluated and mapped to constants.
- Nodes that describe tensor computations are converted to one or more TensorRT layers.
- The remaining nodes stay in TorchScripting, forming a hybrid graph that is returned as a standard TorchScript module.
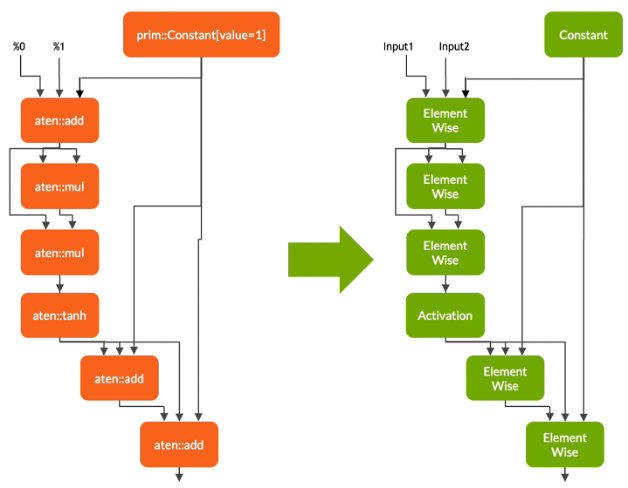
The modified module is returned to you with the TensorRT engine embedded, which means that the whole model—PyTorch code, model weights, and TensorRT engines—is portable in a single package.
Execution
When you execute your compiled module, Torch-TensorRT sets up the engine live and ready for execution. When you execute this modified TorchScript module, the TorchScript interpreter calls the TensorRT engine and passes all the inputs. The engine runs and pushes the results back to the interpreter as if it was a normal TorchScript module.
Torch-TensorRT features
Torch-TensorRT introduces the following features: support for INT8 and sparsity.
Support for INT8
Torch-TensorRT extends the support for lower precision inference through two techniques:
- Post-training quantization (PTQ)
- Quantization-aware training (QAT)
For PTQ, TensorRT uses a calibration step that executes the model with sample data from the target domain. IT tracks the activations in FP32 to calibrate a mapping to INT8 that minimizes the information loss between FP32 and INT8 inference. TensorRT applications require you to write a calibrator class that provides sample data to the TensorRT calibrator.
Torch-TensorRT uses existing infrastructure in PyTorch to make implementing calibrators easier. LibTorch provides a DataLoader and Dataset API, which streamlines preprocessing and batching input data. These APIs are exposed through C++ and Python interfaces, making it easier for you to use PTQ. For more information, see Post Training Quantization (PTQ).
For QAT, TensorRT introduced new APIs: QuantizeLayer and DequantizeLayer, which map the quantization-related ops in PyTorch to TensorRT. Operations like aten::fake_quantize_per_*_affine is converted into QuantizeLayer + DequantizeLayer by Torch-TensorRT internally. For more information about optimizing models trained with PyTorch’s QAT technique using Torch-TensorRT, see Deploying Quantization Aware Trained models in INT8 using Torch-TensorRT.
Sparsity
The NVIDIA Ampere architecture introduces third-generation Tensor Cores at NVIDIA A100 GPUs that use the fine-grained sparsity in network weights. They offer maximum throughput of dense math without sacrificing the accuracy of the matrix multiply accumulate jobs at the heart of deep learning.
- TensorRT supports registering and executing some sparse layers of deep learning models on these Tensor Cores.
- Torch-TensorRT extends this support for convolution and fully connected layers.
Example: Throughput comparison for image classification
In this post, you perform inference through an image classification model called EfficientNet and calculate the throughputs when the model is exported and optimized by PyTorch, TorchScript JIT, and Torch-TensorRT. For more information, see the end-to-end example notebook on the Torch-TensorRT GitHub repository.
Installation and prerequisites
To follow these steps, you need the following resources:
- A Linux machine with an NVIDIA GPU, compute architecture 7 or earlier
- Docker installed, 19.03 or earlier
- A Docker container with PyTorch, Torch-TensorRT, and all dependencies pulled from the NGC Catalog
Follow the instructions and run the Docker container tagged as nvcr.io/nvidia/pytorch:21.11-py3.
Now that you have a live bash terminal in the Docker container, launch an instance of JupyterLab to run the Python code. Launch JupyterLab on port 8888 and set the token to TensorRT. Keep the IP address of your system handy to access JupyterLab’s graphical user interface on the browser.
Jupyter lab --allow-root --IP=0.0.0.0 --NotebookApp.token=’TensorRT’ --port 8888
Navigate to this IP address on your browser with port 8888. If you are running this example of a local system, then navigate to Localhost:8888.
After you connect to JupyterLab’s graphical user interface on the browser, you can create a new Jupyter notebook. Start by installing timm, a PyTorch library containing pretrained computer vision models, weights, and scripts. Pull the EfficientNet-b0 model from this library.
pip install timm
Import the relevant libraries and create a PyTorch nn.Module object for EfficientNet-b0.
import torch
import torch_tensorrt
import timm
import time
import numpy as np
import torch.backends.cudnn as cudnn

torch.hub._validate_not_a_forked_repo=lambda a,b,c: True

efficientnet_b0 = timm.create_model('efficientnet_b0',pretrained=True)
You get predictions from this model by passing a tensor of random floating numbers to the forward method of this efficientnet_b0 object.
model = efficientnet_b0.eval().to("cuda")
detections_batch = model(torch.randn(128, 3, 224, 224).to("cuda"))
detections_batch.shape
This returns a tensor of [128, 1000] corresponding to 128 samples and 1,000 classes.
To benchmark this model through both PyTorch JIT and Torch-TensorRT AOT compilation methods, write a simple benchmark utility function:
cudnn.benchmark = True

def benchmark(model, input_shape=(1024, 3, 512, 512), dtype='fp32', nwarmup=50, nruns=1000):
    input_data = torch.randn(input_shape)
    input_data = input_data.to("cuda")
    if dtype=='fp16':
        input_data = input_data.half()

    print("Warm up ...")
    with torch.no_grad():
        for _ in range(nwarmup):
            features = model(input_data)
    torch.cuda.synchronize()
    print("Start timing ...")
    timings = []
    with torch.no_grad():
        for i in range(1, nruns+1):
            start_time = time.time()
            pred_loc  = model(input_data)
            torch.cuda.synchronize()
            end_time = time.time()
            timings.append(end_time - start_time)
            if i%10==0:
                print('Iteration %d/%d, avg batch time %.2f ms'%(i, nruns, np.mean(timings)*1000))

    print("Input shape:", input_data.size())
    print('Average throughput: %.2f images/second'%(input_shape[0]/np.mean(timings)))
You are now ready to perform inference on this model.
Inference using PyTorch and TorchScript
First, take the PyTorch model as it is and calculate the average throughput for a batch size of 1:
model = efficientnet_b0.eval().to("cuda")
benchmark(model, input_shape=(1, 3, 224, 224), nruns=100)
The same step can be repeated with the TorchScript JIT module:
traced_model = torch.jit.trace(model, torch.randn((1,3,224,224)).to("cuda")])
torch.jit.save(traced_model, "efficientnet_b0_traced.jit.pt")
benchmark(traced_model, input_shape=(1, 3, 224, 224), nruns=100)
The average throughput reported by PyTorch and TorchScript JIT would be similar.
Inference using Torch-TensorRT
To compile the model with Torch-TensorRT and in mixed precision, run the following command:
trt_model = torch_tensorrt.compile(model,
    inputs= [torch_tensorrt.Input((1, 3, 224, 224))],
    enabled_precisions= { torch_tensorrt.dtype.half} # Run with FP16
)
Lastly, benchmark this Torch-TensorRT optimized model:
benchmark(trt_model, input_shape=(1, 3, 224, 224), nruns=100, dtype="fp16")
Benchmark results
Here are the results that I’ve achieved on an NVIDIA A100 GPU with a batch size of 1.

Summary
With just one line of code for optimization, Torch-TensorRT accelerates the model performance up to 6x. It ensures the highest performance with NVIDIA GPUs while maintaining the ease and flexibility of PyTorch.
Interested in trying it on your model? Download Torch-TensorRT from the PyTorch NGC container to accelerate PyTorch inference with TensorRT optimizations, and no code changes.

